AKIYAMA PULSAR
SETUP
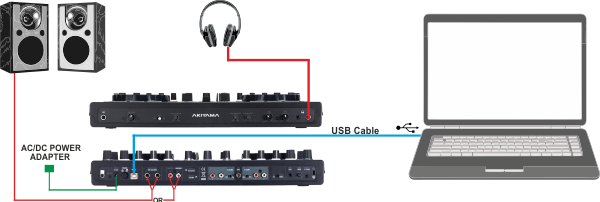
Step 1. Connections
- Connect the Akiyama Pulsar with your computer using the provided USB cable.
- Connect your Headphones to the front socket of the unit and your amplifier/amplified speakers to the Master Out socket at the rear side using an RCA cable.
- Connect the unit with an AC Power Outlet using the provided AC/DC Power Adapter.
- Power on the unit after all the above connections are done.
Step 2. Drivers
Windows only : Install the Akiyama ASIO drivers from http://www.akiyamadj.com/akiyama+pulsar+2+channels+midi+controller-p-PULSAR.html?cPath=115_117
No drivers is required to be installed for Mac OSX computers
Step 3. VirtualDJ Setup
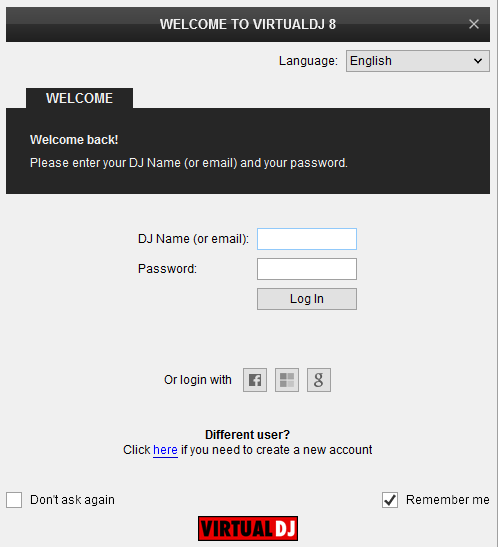
Once VirtualDJ 8 is opened, a Login Window will appear. Login with your virtualdj.com account credentials.
A Pro Infinity or a Pro Subscription License is required to use the Akiyama Pulsar. Without any of the above Licenses, the controller will operate for 10 minutes each time you restart VirtualDJ 8.
http://www.virtualdj.com/buy/index.html
Detection Window
Click to “Use Soundcard”. VirtualDJ will automatically create the necessary audio configuration. Speakers need to be connected to the rear side of the unit in this case.
Click to OK
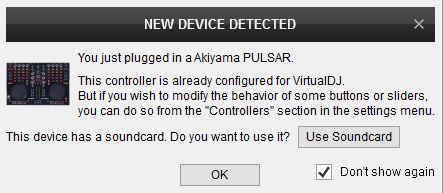
The unit is now ready to operate with VirtualDJ
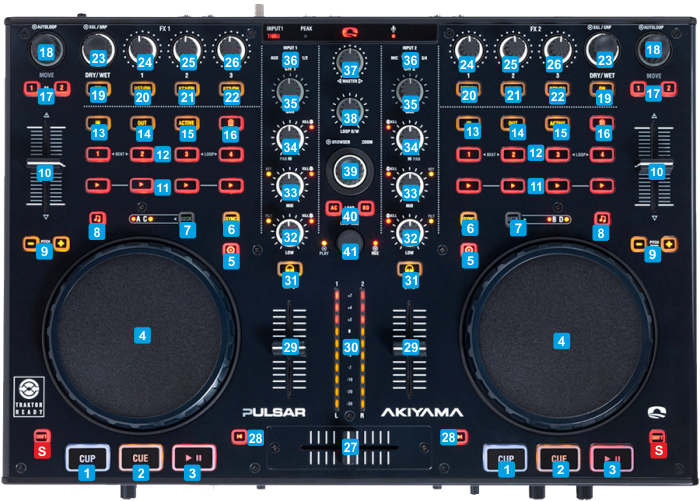
CONTROLS
KEY
ACTION
SHIFT (SECONDARY) ACTION
Delete the assigned Hotcue when the Delete mode is enabled
Hotcue 3 : Enable/disable Smart Cue
Hotcue 4 : Enable/disable Smart Loop
FX2 : Sets FX buttons and knobs to Sampler mode
Push to enable/disable an Auto-Loop of the selected size in beats
Push to enable/disable Loop Back mode
In Sampler mode : Records deck to a new sample
In Sampler mode : If the selected Sample is in Loop mode, halves the size of the Sampler Loop
In Sampler mode : If the selected Sample is in Loop mode, doubles the size of the Sampler Loop
In Sampler mode : Sets the selected Sample to Loop (repeat) mode
Push to trigger the selected Effect
In Sampler mode : Selects the previous/next Sample from the selected Sampler Bank
Push to trigger the selected Sample
Push to open/close the FX GUI of the selected Effect.
In Sampler mode : Selects the previous/next available Sampler Bank.
Push to select the next available Sampler Trigger mode for the selected Sampler Bank
Right button : Enable/disable Video Crossfader Link. When enabled, the Video Crossfader will be linked to the Audio Crossfader and will follow its position
Push to kill (cut) the frequencies of the Low Equalizer Band
Push to reset (turn off) Filter
Push to kill (cut) the frequencies of the Middle Equalizer Band
Push to reset track's Key to the original value
Push to kill (cut) the frequencies of the High Equalizer Band
Set to middle position to route the USB Input to a Mixer Channel and control a VirtualDJ Deck.
Set to AUX/MIC or IN 1/2 -3/4 to route an external source connected to the rear panel to a Mixer Channel.
If focus is on the Songs List, push to add the selected track to the Automix List.
If focus is on the Sideview, push to load the selected track to the default Deck.
If focus is on the Folders List, push to open the next available sub-folder if the current folder has no tracks, or set focus to the Songs List if the current folder has tracks.
If focus is on Folders List, push to open/close sub-folders.
If focus is on the Songs List, push to add the selected track to the Sidelist.
If focus is on the Sideview, push to cycle through the available views of the Sideview
Adjust the 1st Parameter of the selected Video Transition, while the Transition is active.
Push to trigger the selected Video Transition
Adjust the 1st Parameter of the selected Master Video Effect while the Video Effect is active.
Push to trigger the selected Video Effect on Master
FRONT & REAR PANELS

KEY
Operation

Advanced Setup
The built-in audio interface of the Akiyama Pulsar offers 2 stereo inputs and all 4 available Inputs, (AUX, 2xLINE and Microphone Input) can be routed either directly to the Master Output or routed to VirtualDJ, depending on the back PC/THRU switcher.
External sources
Connect any CD player, Turntable or other media source to the Inputs 1/2 , 3/4 or AUX at the rear side of the unit. You can then choose one of the following ways to output those Inputs to the Master Output of the unit.
Routing Inputs to VirtualDJ
Make sure the PC/THRU switcher at the back of the unit is set to PC position. Go to the AUDIO tab of VirtualDJ config and click on the LINE INPUT button in order the following audio setup to be created.
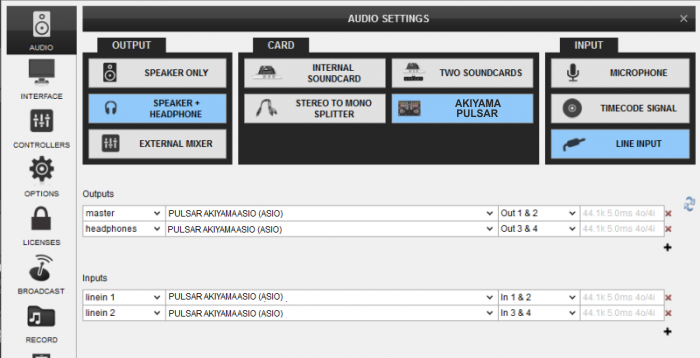
 Click to APPLY.
Once the Line Inputs are set as above in the Audio setup, 2 AUX panels will appear on the skin next to the Jogwheels (in the SCRATCH panel of the 4 Decks default skin). Click on the AUX buttons to route the external source to the left or right deck.
Use the INPUT1 and INPUT2 (36) source selectors at the top panel of the unit to select which source you wish to use (AUX/LINE12 for the left and MIC/LINE34 for the right)
Routing Inputs directly to the Master Output
This option is mainly used if you wish to directly output a media source (e.g. a CD player) without VirtualDJ to handle these inputs. Use the PC/THRU switcher at the back of the unit to route the external sources (at THRU position) or the software decks (at PC position) to the Master Output..
In this case, no special audio configuration is required (use the pre-defined that the special button offers)
Note that the mixer of the Akiyama Pulsar will not control the volume of the external sources (will not operate as a standalone mixer) except from the Master Volume knob. The mixer of the unit will still continue to control the software internal mixer, however once the THRU position is selected from the rear side, the sound output of the software decks will be muted
Timecode
The Akiyama Pulsar is capable of Timecode setup and control (DVS).
Connect your CD players or your Turntables to the Line Inputs 1/2 and 3/4. Set the PC/THRU switcher (54) to the PC position. Go to the AUDIO tab of VirtualDJ config and click on the TIMECODE SIGNAL button in order the following audio setup to be created.
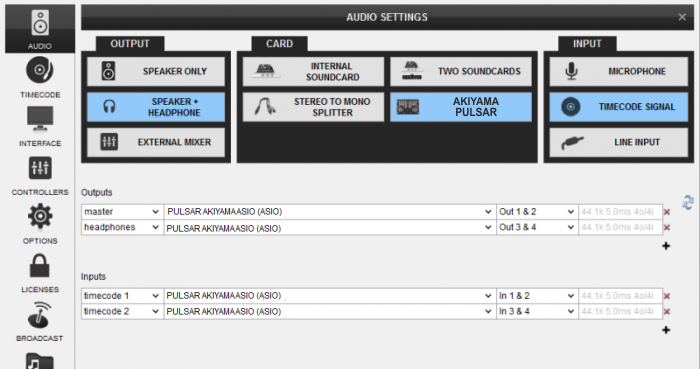
Click to APPLY.
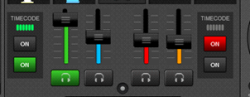 Once the Timecode Inputs are set as above in the Audio setup, the TIMECODE panels will appear at the SCRATCH center panel of the default 4 deck skin (or on the side of the Jogwheels for the 2 Decks skin).
 Use the ON buttons to enable the timecode control to any of the 4 software decks.
Note. Timecode function requires a Pro Infinity license
Microphone & Recording
The Microphone Input of the Akiyama Pulsar is directly routed to the Master Output of the unit, therefore there is no reason to modify the audio configuration in order to use it properly.
However, in case you will need to record (or broadcast) the microphone along with your mixes, you will need to choose the MIC position from the INPUT2 source selector (36) and manually create the following audio configuration by adding a mic line assigned to Input channels 3&4.

Set the PC/THRU back selector to the PC position and enable the MIC from the MASTER center panel.
Note that the Microphone will still go through to the Master Output of the Akiyama Pulsar even if the MIC ON is disabled from the software.
To operate the microphone, you will still need to adjust its volume from the front panel and turn it on/off from the front switcher as well.
No special audio configuration is required in order to simply record your mixes with the Akiyama Pulsar
